Module 1: Your Toolkit
The UX/UI Bootcamp will expose you to many new tools, some (or all) of which will be new to you. Believe it or not, these tools will soon be be as familiar to you as using email or an app on your phone.
This section summarizes each tool, then gives you an opportunity to install the tools. We have also included some tips and resources so that you can familiarize youself with some of the tools.
Required Supplies
Boot Camp success depends on having the right equipment. The list of supplies below are required.
- Laptop with at least 8GB ram and 64-bit dual processor.
- Note: Macs with an M1 chipsets are compatible with the course.
- Note: Linux machines are not compatible for this course.
- Sticky Notes
- Paper
- Pens, pencils, and markers.
> Note: If your class is being held online, you will not need writing and paper materials.
An Overview of Your Software Tools
Below is a list of the seven tools you should have ready to go on your first day of class:
- Google Chrome
- Google Drive
- Slack
- Adobe XD
- Figma
- InVision
- Miro
- GitHub & GitHub Desktop
- VS Code
- Zoom
Before installing these tools, take a moment to read their descriptions. That way you'll have context for the role each tool plays in your UX/UI Boot Camp work.
Note: There will be time on the first day of class to double-check that you have installed all of these tools correctly.
1. Google Chrome
![]()
This is the web browser we'll be using to quickly determine whether our code is working. Google Chrome has a number of tools and extensions that make it an ideal platform for designers and web developers, so if you are currently using a different browser, switch over to Chrome for the Boot Camp.
Install Chrome
If you don’t already have Chrome installed, visit the download page here. Next, download, open, and run the installation file.
2. Google Drive
![]()
Google Drive is a file storage and synchronization service. It allows users to store files in the cloud, synchronize files across devices, and share files.
Throughout the boot camp, you will use Google Drive to access lecture slides, activity files, and homework. You will receive access to the class specific Google Shared Drive during the online orientation. You use your personal Google Drive to submit your assignments.
Install Google Drive
Step 1. Go to Google.com.
Step 2. Click the Sign in button in the top-right corner of your browser window.
Step 3. Click More options, and then select Create account.
Step 4. Fill out the form and click the Next step button.
Step 5. Read Google's Privacy and Terms disclosure and agree to the terms.
Step 6. On the Welcome! page, click Continue to go to the Google homepage.
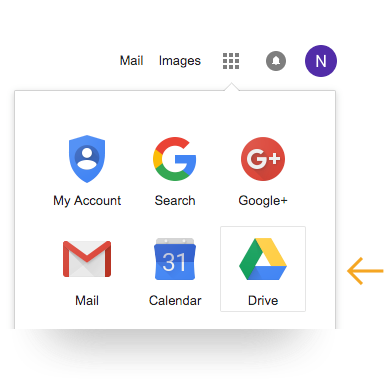
Step 7. Click the grid icon located in the top-right hand corner of your browser window to access Google apps. Select the Drive icon from the drop-down menu.
Once in your Drive, you can create and upload files and folders, which you will can then share with others via a link. To upload and share a folder with your instructor, for example, follow these steps:
Step 1. Click New and select Folder upload from the drop-down menu.
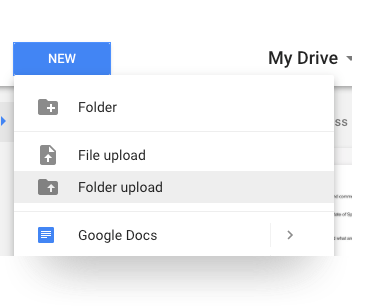
Step 2. Select the folder you want to upload and click Upload. A copy of the folder will now be in your Drive.
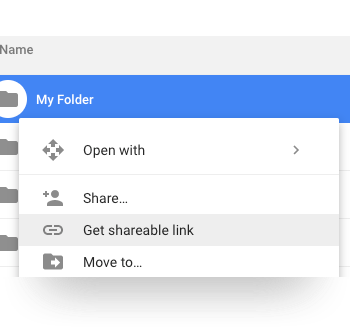
Step 3. Right-click on the folder in your Drive and select Get shareable link from the drop-down menu.
Step 4. Click Sharing settings. Choose the Anyone with the link can edit option, and then click Done.
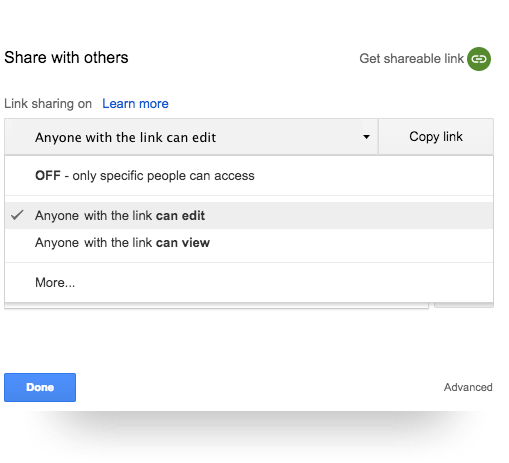
You're all set! Your instructor will now be able to make edits to your folder once they have the link. To send the link, simply click Copy link before clicking Done. You can then paste the link in an email.
3. Slack
![]()
Slack is an online communication tool that is a mix of forum, instant messenger, and email all rolled into one. It's a tool used by countless organizations worldwide, and you'll be using it every single day for the next six months.
We will use Slack to send activity files during class, relay important announcements, and facilitate group exercises. You will receive the link to your class-specific channel during orientation. Though there is a Slack web client, for this course you should have the program installed on your machine and phone.
Install Slack
Step 1. Go to Slack. Click Download.
Step 2. When the installation is complete, add our channel to your application. If you already use the Slack app, you just need to add our channel to your application.
Step 3. Click the header of your current Slack channel.
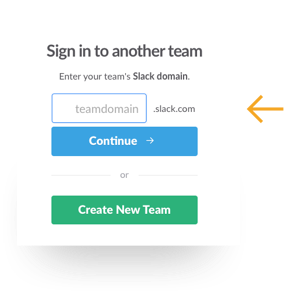
Step 4. Select Sign in to another team.
Step 5. Enter the Slack domain provided to you during orientation.
Step 6. Enter your email (the one that the Slack invite was sent to) and password.
4. Adobe XD
![]()
Adobe XD is a cutting-edge, cross-platform tool that allows users to rapidly design interfaces, make animated clickable prototypes, and collaborate. It focuses on collaboration, design, animation, and prototyping all in one.
Install Adobe XD
For this class, you will need to install Adobe XD's free starter plan
Note: You do not need to purchase Adobe Creative Cloud for this boot camp.
Step 1. Go to Adobe XD Page and click download.
Step 2. Make an account and install XD.
Note: The Adobe XD Starter Plan comes with some sharing limitations. You will not need a paid subscription for the boot camp. Accounts will automatically revert to the Starter Plan after cancelling a paid subscription or free trial.
Tip: It's also a good idea to get the mobile app to view your prototypes on phone screens.
Get XD from the Google Play Store.
5. Figma
![]()
Similar to Adobe XD, Figma is a cross-platform vector prototyping tool that lets designers rapidly create interfaces and prototypes. It is completely cloud-based and allows for live collaboration with other designers on the same file.
Create a Figma Account
For this class, please create a free Figma account. Once class has begun, your instructor will invite you to a Figma team space where you will be able to create unlimited designs for the duration of the class.
Step 1. Go to Figma Page and click Sign Up.
Step 2. Create an account.
Apply for the Education Plan
Our boot camp has partnered with Figma to provide our students with a free educational license for two years! Follow these steps to receive your upgrade.
Step 1. Open the Figma Education page and select Apply for the free Education Plan.
Step 2. Complete the application procedure.
Step 3. Within a day or two, you may receive an email from [email protected] to confirm your enrollment status. Respond with a link to the boot camp and a screenshot of your enrollment email.
A Note on Vector Tools
There are many different tools used in the industry for creating vector-based designs. Currently, the tools leading in the industry are Sketch, Figma, and Adobe XD. We chose to feature Figma and Adobe XD for their cross functionality and freemium pricing model. This boot camp is designed to be tool "agnositc" meaning you are free to use any tool you want. In fact, we encourage you to explore different tools and find out what works for you. However, the activity files and templates provided in the course will be designed for Adobe XD and Figma. Tools will come and go. We are more concerned with your design process and how you execute your designs than which particular tool you use.
To learn about tool usage in the industry, go to uxtools.co
6. InVision
![]()
In this course, you will be using InVision to build prototypes and collaborate. This tool can help you communicate your thoughts and ideas as well as figure out whether what you are trying to do will work.
Create InVision Account
Note: If you already have an account, email [email protected] along with your expected graduation date. They will process your account and ensure that you get upgraded to the educational plan.
Step 1. Go to the InVision website to create an account and apply for a free education license.
Use the validation code 20-10-27-34. Once submitted, you'll shortly receive a free account upgrade for the duration of the program.
Note: Currently, educational users are using V6 of InVision, but will eventually be migrated to V7. You may need to log in with this link to use V6: https://projects.invisionapp.com/d/login?origin=v7. Once logged in, you will be presented with a screen to choose which account to access (V7 or V6). To access the V6 account (which we recommend), select the "Personal" option.
7. Miro
![]()
While designers love drawing on whiteboards and using copious amounts of sticky notes during ideation and brainstorm sessions, it's nice to have a digitized version to reference later. Miro is a online collaborative platform that allows teams to work together on a virtual whiteboard and digital sticky notes.
Create Miro Account
Step 1. Go to the Miro website and sign up for a free account.
Note: The free version only allows the creation of three boards. You do not have to purchase a Miro license to complete or be successful in the bootcamp. To overcome the board limit, we recommend that you maximize the amount of space used on a board and take frequent screenshots of your boards to save your work.
8. Git, GitHub, and GitHub Desktop
![]()
Code files are largely collaborative, as developers are constantly building on each other's work. Git is a version-control system that offers a specialized set of strategies for orchestrating this collaboration. GitHub stores these collaborative actions online. You can think of GitHub as a sort of Dropbox for coders. It offers a central place for developers to upload their code, view revision history, and make changes to a master set of files. You'll come to learn a lot about Git and GitHub when we hit the coding portion of the boot camp.
GitHub Desktop is tool that is going to make life a lot easier working with GitHub. GitHub Desktop is the sleek graphical user interface (GUI) that makes uploading and downloading files simpler without having to use the command line. It's easy to use even if you have no experience with GitHub.
Install GitHub and GitHub Desktop
Step 1. Create an account at GitHub.
Step 2. Go to the GitHub Desktop page. Click download.
Note: If your computer is using an Apple silicon chip, you may need to run Rosetta to use GitHub Desktop. Install Rosetta.
9. VS Code
![]()
Oh, the power of VS Code—a little program that does so much!
Visual Studio (VS) Code is a free text editor that runs on Mac, Linux, and Windows operating systems. For developers, text editors are like the cozy pillow on which they rest their heads.
At a fundamental level, programming is all about creating text in files with various extensions. When we create a block of HTML like the one below, what we've really done is create a block of text. There are some funny symbols in there, but at its most basic level, it's just text.
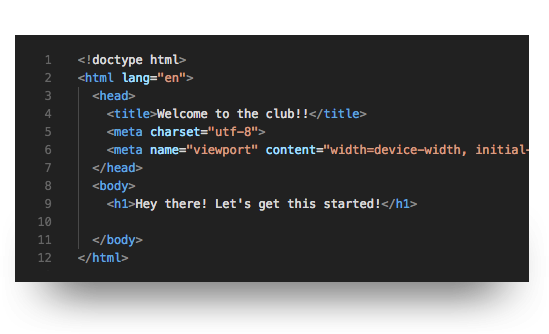
For a simple text editor, this is where the comprehension stops: our block of HTML remains a block of text. But for more powerful text editors like VS Code, these blocks of text are immediately recognized as code (as long as we include the right file extension). VS Code can provide a more visually intuitive understanding of the code through indicative coloring, smart tabs, and autocomplete functionality. As a result, creating HTML like the block above is a more natural process and can be debugged more quickly.
Install VS Code
Step 1. Go to the setup page on the VS Code website and select Windows or macOS as your platform.
Step 2. Click Visual Studio Code installer.
Step 3. When the download is complete, run the installer file (VSCodeSetup-version.exe).
Note: For a 64-bit machine, VS Code is installed under C:\Program Files \(x86\)\Microsoft VS Code.
Note: If your computer is using an Apple silicon chip, you may need to run Rosetta to use GitHub Desktop. Install Rosetta.
10. Zoom
![]()
If your class is being held remotely, you will be using Zoom to interact with your classmates and instructional team. Use the following videos to guide you through the installation process and introduce you to some of the great features you may see throughout your classroom experience!
11. LinkedIn
![]()
It is important for yourself to have an online presence in the design industry. Throughout the boot camp, Career Services will coach you on how to best present yourself on LinkedIn. Create a LinkedIn account if you don't already have one.
Create a Linkedin Account
Step 1. Go to LinkedIn and follow the steps to create an account.
Step 2. Create a full profile highlighting your skills and work experience, and include a headshot.
Tool Tips
Google-Fu Tips
As you progress in your career, you will have questions. Many questions. This is why you need some Google-fu in your life.
Google-fu (adjective): "The skill of using search engines, particularly Google, to quickly find information."
This may sound easy enough, but the process isn't always straightforward. Considering there are billions of pages of information on the Internet, spending time now to improve your search skills will save time later.
Make searches that are simple, yet specific. For example, “JavaScript remove key from object" is an example of good Google-fu. However, "JavaScript key object" is not a skillful search.
Look for keywords. Though not ideal, clicking through several pages of search results is not necessarily a waste of time. Doing this may help you notice keywords that can help you refine your search and yield a more precise set of results. Think of these keywords as little gems that will help lead you to the mine.
Practice search techniques. Check out Mike Miller's Google Search tips, such as how to exclude words that have more than one meaning and use -, ~, OR and AND—it's all covered in this article!
Tool Tutorials
We cover a lot of ground in the boot camp, so we need you to be comfortable with these tools beforehand. We highly recommend that you go through the following tutorials before you start class.
Figma Tutorials
Getting Started Playlist (1 hour).
Note: Some tutorials will require an upgraded account. You can watch them now and return to follow along once you've received an education license.
Adobe XD Tutorials
Getting Started in Adobe XD Playlist (30 minutes).
Miro Tutorials
Getting Started with Miro Playlist (10 minutes).
Visit the Career Engagement Network
Career Engagment Network – A robust portal to help you develop your materials, explore possible pathways, and utilize best practices for networking and interview preparation. You’ll also gain access to job search strategies, workshops, events, and more!
Well Done!
That's all for the installations. Give yourself a pat on the back for a job well done!
(Installations are never fun, but just like taxes, you gotta do them.)
Prework Support
Looking for prework support? Our team of creative coaches are eager to help! Request a creative coach session with the following steps:
1. Login to Bootcampspot (BCS) with your credentials (emailed 24 hours after enrollment).
2. Click "Support" in the top right.
3. Complete the form fields to submit your request:
-
Select "Session: Pre-work"
-
Enter "Additional Notes: Prework - Tool Install"